Pages

Sunday, May 15, 2016

Hiking Diaries: Aliso and Wood Canyons


It has been a while since I have been on a challenging hike. The type that leave you in tears under the hot summer sun and weight of your pack. I’m not ashamed to say I’ve cried on a trail before, though it was 5 years ago under very different physical and emotional circumstances. I probably wasn’t hydrated enough. I didn’t know then what I know now, which I’m sure still isn’t enough.


Challenging hikes happen to great hikers, so being an okay hiker seeking a challenging hike seemed a little scary. Earlier this week the thought that a hike hadn’t brought me to tears in a while was my way of telling myself I was ready for a challenge. Five, six milers just weren’t cutting it anymore. Sure the scenery was beautiful, but I was ready for more. My IG feed was full of hikers summiting 12 mile hikes with thousands of feet in elevation change. I wanted that. Just not yet.


I chose a moderate hike that should have been just over 7 miles starting at the Top of the World in Laguna Beach and passing through Aliso Canyon Woods, the Dripping Caves and Car Wreck Trail. Arriving at the trail an hour later than I had planned, the sun was still hidden behind the morning ocean clouds which made for a cool start. I didn’t love the first 2 miles of West Ridge trail which is completely exposed, and is heavily populated by both group hikers and cyclist wizzing by.


Reaching Lynx trail I was finally descending into the canyon and much more alone. All I could hear were my footsteps, the bees alongside the blooms of the trail, birds chirping and occasionally leaves in the wind. The trail itself changed from dusty dirt to rock, with many more trees and some shade. I took a short side trail that overlooked the canyon below and caught sight of a vintage car wreck, however not the car wreck that is known on these trails. I came across another female solo hiker and said good morning. It had been a while since I had seen someone and it was nice to know I wasn’t the only hiker in the canyon. This must be how thru hikers feel when they meet someone on the trail.


When Lynx meets Woods Canyon at the bottom of the canyon, I headed towards the junction for Dripping Caves trail. I crossed a series of narrow bridges that were used by hikers and cyclists to avoid the small stream of water. The trail along the canyon floor wasn’t as desolate as Lynx, but much less traveled than the crowded West Ridge trail. Lined with Sycamores, white and yellow blooms, the trail was wide and well taken care of. There wasn’t much trash along the trail, but I also wasn’t going out of my way to pick up trash deep in the bushes because of the many bees along the trail.


I opted to approach Dripping Caves from the South, instead of from the North so I wouldn’t double back and could explore more of the trails. The caves themselves were less than impressive. Legend says they were used by robbers as a hideout after robbing stage coaches or cattle. Personally, I don’t know that I would really call the underside of rock formations caves, but they would provide shelter in a place less explored. Leaving the Dripping Caves I headed North on the Dripping Cave Connector which would take me to the Mathis Canyon trail to Car Wreck Trail. That didn’t go as planned.


The Dripping Cave Connector is a beautiful narrow trail that slightly climbs then descends the side of the canyon. The trail is both rock and sand with wild flowers on either side. About ¾ of the way through just after a short switch back I passed a tree with exposed roots and a cave just beyond it. I stopped to take a photo and noticed I had caught up to 2 hikers that were about 50 feet in front of me and were hiking a narrow portion of the trail that passes through long dry grass. As I started through the meadow I heard the rattling of maracas. Twice. I stopped, took a few steps backwards and turned around. I had never heard a rattle snake before, and although I did not see it, it was such a distinct sound, I have no doubt it was there. I was conflicted on what to do next.


I had options to get back to the top of the canyon, however considering I was by myself I decided to play it safe and retraced my steps back to Dripping Caves to Woods Canyon and headed North to the junction to Mathis Canyon Nature Loop which would take me back to West Ridge and Top of the World. Here’s where it got tough; first mentally, then physically. As I started retracing my steps I was looking side to side and back and forth along the trail making sure I didn’t come across a snake. I was freaking out. I was getting tired. I was alone.


I recently read that a great way to deal with unwanted thoughts or feelings is to get a rock and while holding it redirect those thoughts or feelings to it. That came to mind so I picked up a small rock off the trail and kept saying over and over, “There is no fear in the wilderness.” It reminded me of Cheryl Strayed’s words about fear from Wild: 

“Fear...is born of a story we tell ourselves, and so I chose to tell myself a different story from the one women are told. I decided I was safe. I was strong. I was brave.”


I let that rock take all of my anxieties and just kept moving. As I climbed out of the canyon the mental challenge became physical. The cloud cover had given way to the sun as I hit mile 7 of my ascent and I had a mile left to climb. Fear was the least of my worries as the burn in my thighs was now the only thing on my mind. My fear mantra soon turned into a yogi mantra that I kept repeating: “Everything is temporary.” The climb, the burn in my thighs, the feeling of being hot. All of it was temporary.


Stopping for breaks as I needed them, I kept climbing and soon found myself  passing groups of hikers. I found that my pace was on par with the pace I had been keeping the rest of the way, even on the flat trails. My GPS confirmed this. When I reached Top of the World I was beet red, sweaty, out of breath, tired and hungry. As I walked to the lookout above the trailhead and caught sight of the Pacific ocean, I was all smiles. This hike didn’t break me because I’m not broken. I didn’t cry because I worked through the fear and pain. 8.56 miles is the farthest I have ever hiked, and I hiked it like a woman; safe, strong and brave.

10 miles - you’re next and I’m coming for you.

Modern Hiker has a great technical review of this hike here. Visit OC Parks for directions.

Monday, April 18, 2016

Sustainable Hiking: Day Pack First Aid Kit


Hiking while raining isn’t everyone’s cup of tea, mine included, so when last weekend’s steady rain seemed endless I decided to ditch my hiking plans and take care of some hiking housekeeping instead. Curling up on the couch I dove into some light reading which included brushing up on the 10 Essentials and Beyond the Basics on the REI blog. My mission was to round out my day pack’s first aid kit.


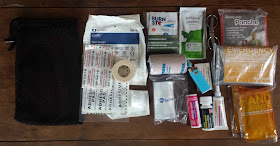
Wanting to keep the process as zero waste as possible, I started by collecting all of the first aid kits I own which included the existing kit in my pack, the one in my car and a variety of supplies I had around the house. I quickly concluded that creating a light, efficient, zero waste first aid kit was going to be a challenge.


The medicated wipes and medicine in the kits were expired by at least 5 years (I guess it should rain more often!). Beyond being expired, the downside was that each dose of medication and wipes were individually wrapped, creating 2 handfuls of waste. I next discovered that finding refills for first aid kits is nearly impossible. Purchasing a new first aid kit was out of the question, because I didn’t need the container or all of the supplies. Luckily, REI offers first aid kit refills such as medicated wipes, ointments and the topical relief kit.


They offer the same for medication, however I choose to go another route that would, in the long run hopefully be less wasteful. I bought travel size tubes of ibprofen and allergy medication that can be refilled by household bottles as needed. I also opted for a small tube of antibiotic cream, instead of single packets. These are light and small enough to carry, without the added waste of single use doses.


The first aid kit in my car included 2 sets of various bandages which included adhesive pads in various sizes, bandages and gauze. I evenly distributed those between the kit for my pack and car, which was plentiful, and meant I didn’t need to purchase anything new. I also added a pair of folding scissors, fabric tape and a pair of tweezers that I had at home, which completed the tools necessary for using the bandages in the kit.


The mesh bag I use to store all of the first aid supplies was purchased years ago for a camping trip and originally came with an eco friendly soap, towel and sponge cleaning kit. The bag is light, compact and by reusing something I already had, nothing new was purchased.


Along with first aid supplies, I also keep a poncho, emergency blanket, hand warmers, waterproof matches and a small bic lighter. I plan on adding a small tea light candle, zip lock bag, needle and thread, duct tape, water purifying tablets, cord and light plastic for an emergency shelter. These items should fit in the same mesh bag, making for a light, compact first aid and emergency kit.


Although I have yet to use my first-aid or emergency kit (knock on wood), it is something I will not go without. It is also one of the instances where safety trumps going zero waste. As long as leave no trace principles are practiced and kit contents are properly disposed of, we as adventurers and advocates of nature are doing the best we can to enjoy the outdoors, while protecting the earth and ourselves.


Do you have experience with a zero or low waste first-aid kit? What are your tips or challenges?

Sunday, March 20, 2016

5 Tips to Greener Crafts


I recently took a hiatus from intentional creativity. After months of watching friends excel in their creativity and being inspired by other’s creative journey, I felt ready to take the plunge. As I set up a painting station outside under my favorite tree I started thinking about how sustainable crafting can or cannot be. I set up a plastic sheet to catch any dripping paint, filled a plastic cup with water, pulled out my plastic bin filled with plastic tubes of paint and unwrapped the plastic wrap from a new canvas.

That’s a lot of plastic, right?

I purchased all of these craft supplies before my road to sustainability took a more serious turn. I’m sure many who find themselves on a journey to sustainability and zero waste find themselves in the same situation. The wrong thing to do would be to throw away all of the supplies because they are packaged in plastic. Instead, I give you 5 ways to create while being green if you are starting or are on a green journey.


1.      Use What You Have

While this might seem obvious, crafters often have hoarding like tendencies. I’m sure we’ve all seen the meme that says someone walked into Target for some milk and walked out with 2 carts full of stuff and forgot the milk. This can be said for crafters walking into Michael’s or Joann’s. I admit I used to be one of these crafters. It wasn’t until I started being more mindful of my purchases that I realized all of those unused craft supplies (AKA spent dollars) weren’t serving a purpose. So, use what you have, and if you have crafty friends, see what they might have. Chances are they might not being using it and would be happy to contribute to your project.

Photo by Folk Dreams Studio


2.      Craft Swap

Sometimes as a maker you know that the well thought out project you purchased all the supplies for is never going to get done. What better way to clear room in your craft room than to swap for craft supplies you may actually need or use? A few friends of mine got together and did just that. I traded fabric, buttons, and tons of scrapbooking supplies for watercolor paints, reusable plastic jars (for travelling!) and colored pencils. The left over supplies from the craft swap were donated to a local craft thrift store, which brings us to tip number 3.

3.      Used Craft Supplies

Someone’s trash is someone else’s treasure – especially if you want to save money. This is such a great way to get supplies for a new craft you might want to try, but aren’t 100% sure about. By giving craft supplies a new life, you are keeping things like paints that come in plastic out of the landfill for a little longer, while avoiding new purchases.


4.      Thrifted and Vintage Supplies

My friend Joan is the host of Break + Remake, a blog and you tube channel that focuses on useful crafts make from thrifted and vintage supplies, giving the old a new life. I’ve had the pleasure of co-hosting an episode with her and sometimes get to help film. She has inspired me to find more sustainable vintage projects since I am a huge fan of both vintage and thrifted items. I recently shared on Instagram that my old man Oliver was having a tough time getting up on my bed. I repurposed a vintage sewing stool into a step for him to jump onto to get on my bed by simply reupholstering the seat. Quick, inexpensive projects can be found with a quick online search, at Break + Remake, or use your imagination.


5.      Consume Consciously

If you are artistic, a maker or crafter, there will come a time when something used, borrowed, thrifted or vintage isn’t going to cut it. It is during those times that I encourage you to think about what it is you are purchasing and if there is a better alternative. Do you sew? How about organic fabric that comes from a trustworthy textile? If you use paints, make sure the VOCs are low. Try to purchase supplies locally if possible. By taking the time to reduce our carbon footprint, use of chemicals and waste, we can create green, eco-friendly projects that allow us to flex our creative muscle without compromising values.


For another great blog post on green crafting visit The Rogue Ginger, who also struggles with how much waste one of her favorite hobbies produces.